Clip art
You can create your own items of clip art, which can be added to the My Files/Favorites section of the Gallery for future use.
You
can optionally specify picture type and size settings for any existing
item of clip art (in the StarBoard Content section), using the Clip Art
item Settings (Note: this functionality is not available for items you
have added to Favorites in the My Files section).
Creating clip art
Deleting clip art
Clip Art Item Settings
Creating clip art
To create clip art and add it to the Gallery, do the following:
- Create or import a picture into StarBoard Software. You can use the Web Image Search to find suitable pictures.
- Select the picture with the Select tool.
- Click
on the Tap menu button (the floating MENU button that appears next to
the picture when it is selected). The pop-up Tap menu will be
displayed.
- In the Tap menu, select the Add to Favorites menu option.
Your picture will be added to the Favorites folder. Please see Managing your favorite pictures.
Deleting clip art
Occasionally, you may need to delete clip art from the Gallery when it is no longer required.
- In the Gallery, find the item of clip art.
- Click on the
 button below the picture and select the Delete option.
- You will be prompted to confirm the deletion. Click on Yes to proceed.
You may also wish to delete items of clip art from your Favorites folder. Please see Managing your favorite pictures.
Clip Art Item Settings
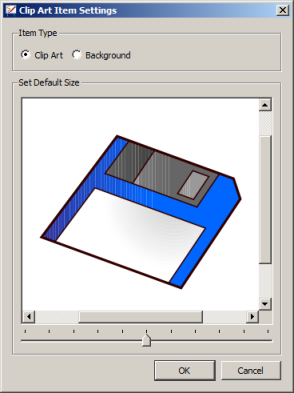
You can set a default size for any of the clip art items in the Gallery.
This means that you can specify the size of the object as it
will appear when you drag it from the Gallery onto the whiteboard area.
To do this, click on the  button below the picture and select the Item Settings... option.
This opens the following dialog:

This dialog shows the clip art at the current size. To change the size, use the slider to make the picture bigger or smaller.
You can also specify whether this picture is to be used as clip
art or as a background image, by using the option buttons. If you set a
picture as a background image, it will automatically go to the
background layer when it is used.
Once you have made your settings, click OK.
These settings will now be used as the default behaviour for the selected item of clip art.
 button below the picture and select the Delete option.
  button below the picture and select the Delete option.
  button below the picture and select the Item Settings... option.